Evaluation

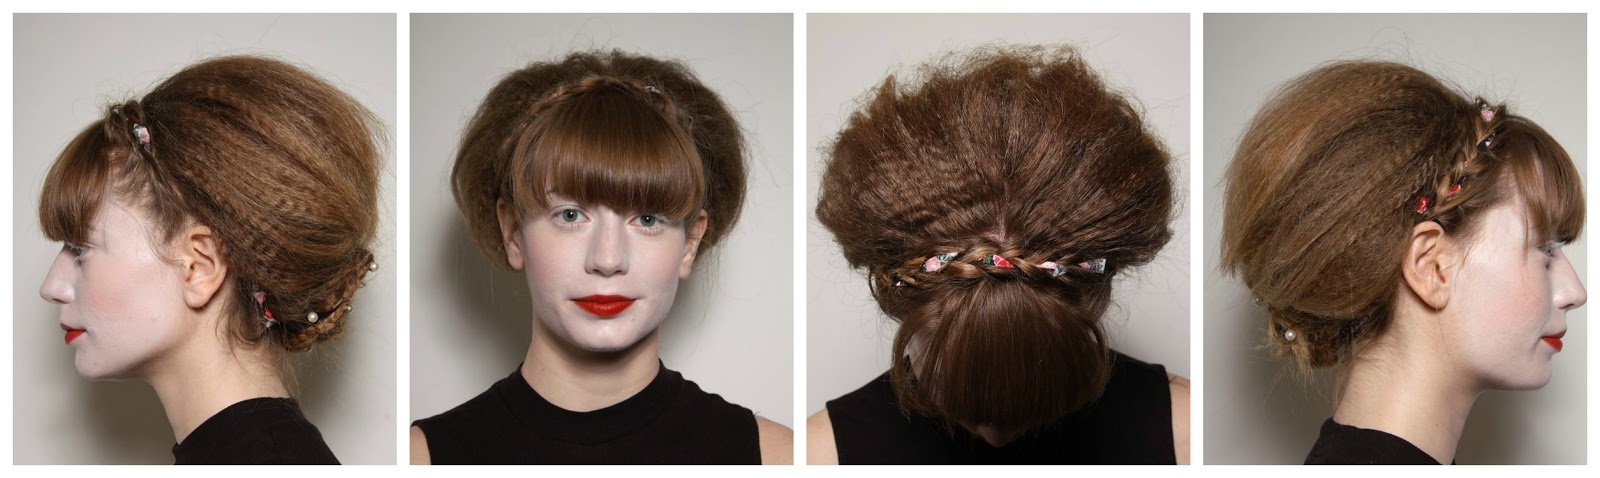
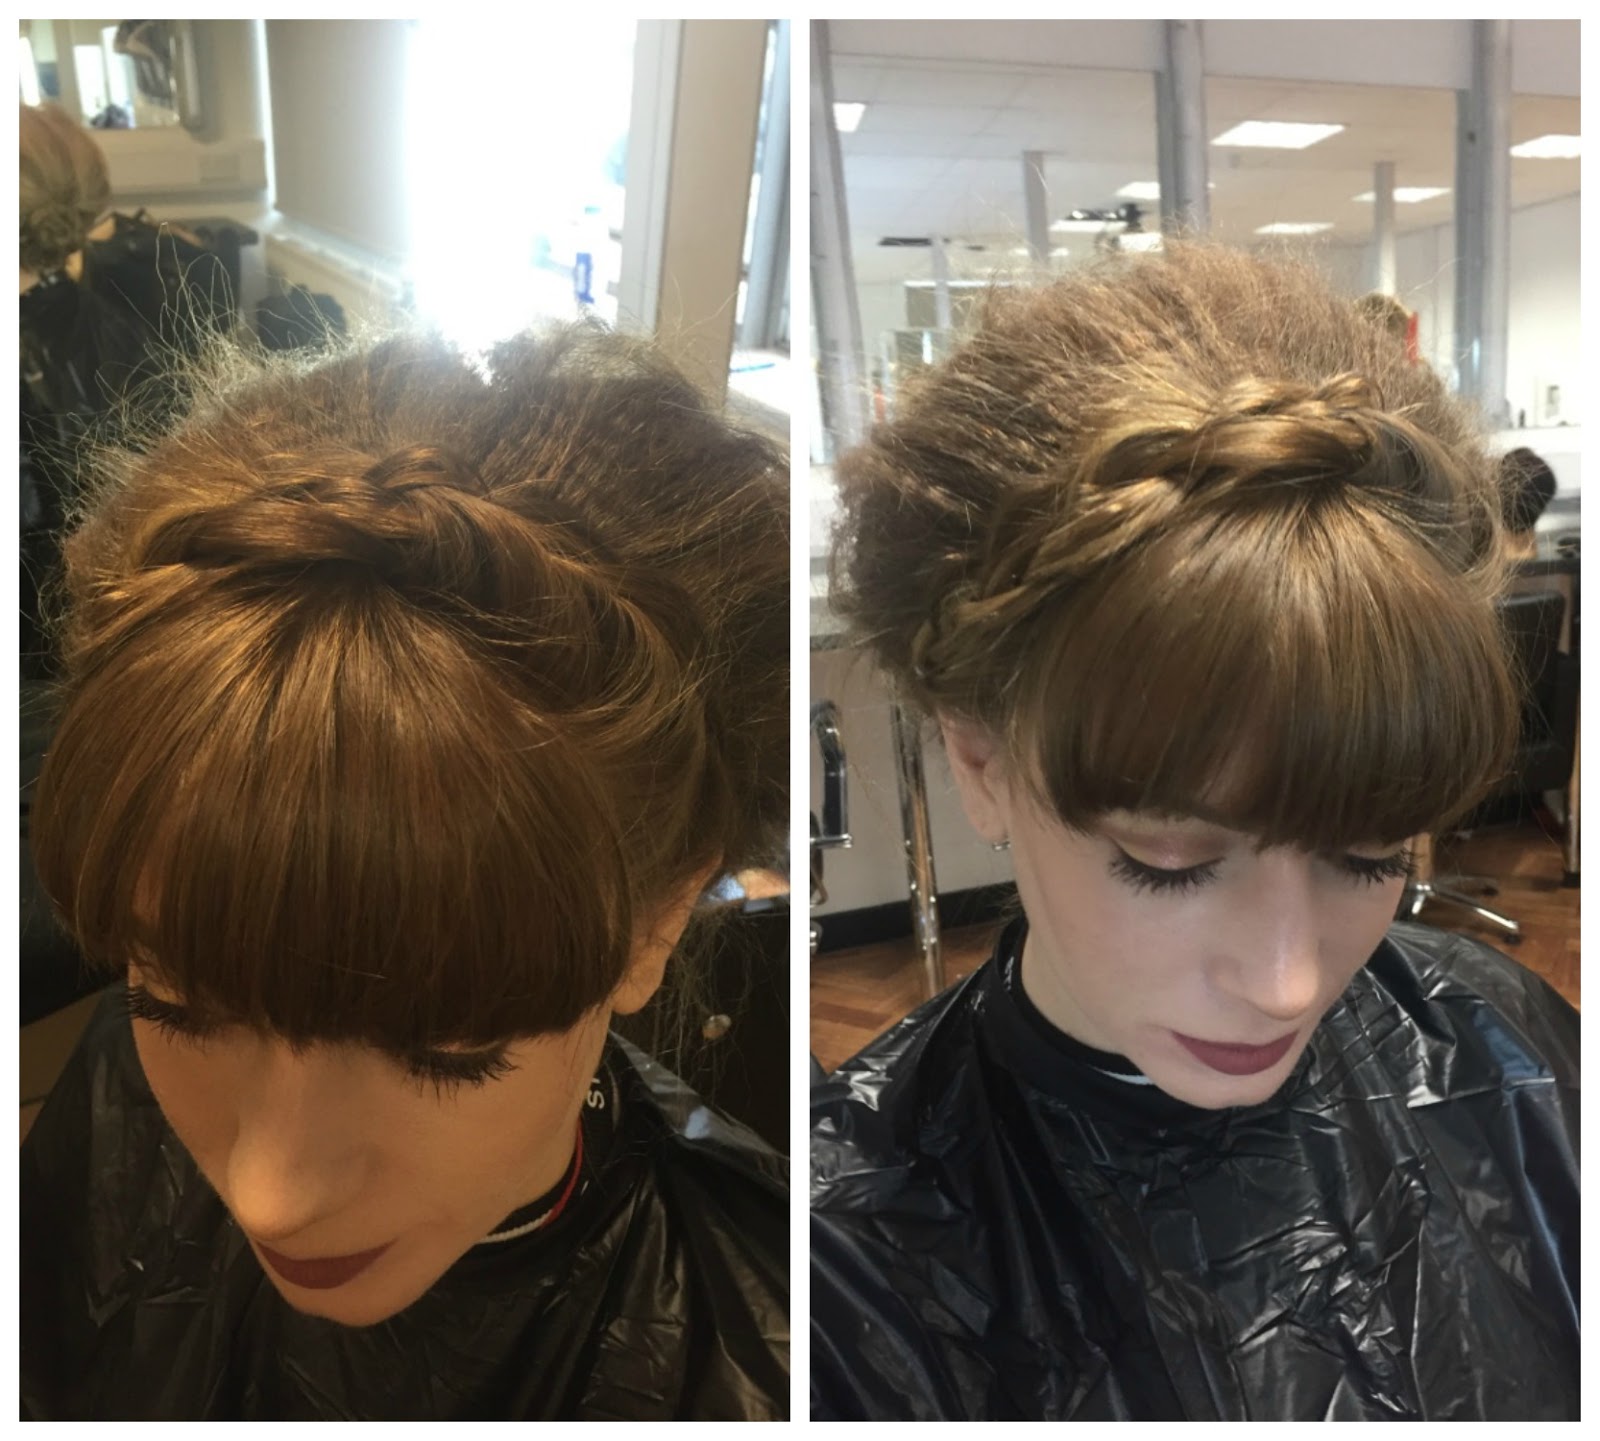
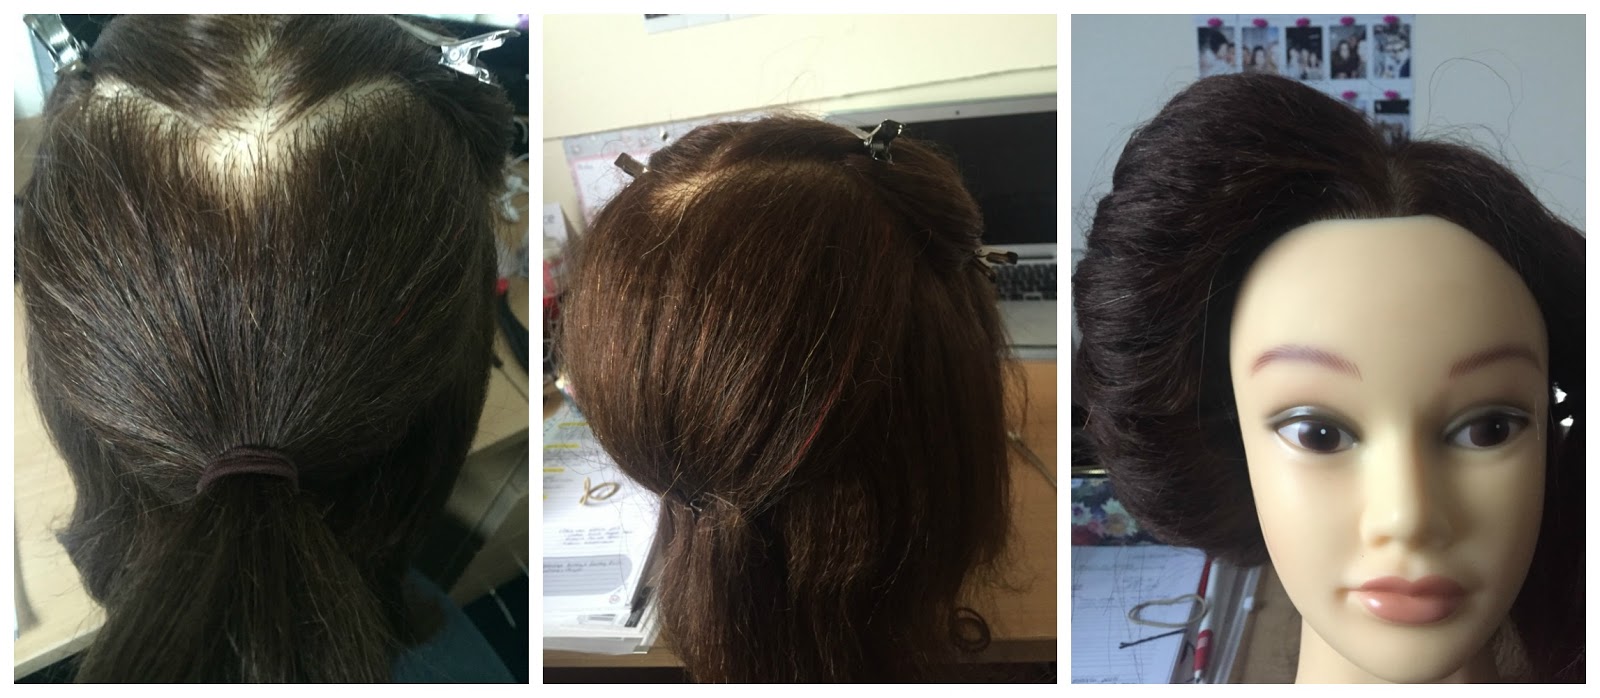
Before starting this unit, I had no experience with hair styling of any sort. I am very surprised with how far I have come in one term. I wanted to include the iconic shapes from the Elizabethan era but in a contemporary style, so I had to play around with techniques and ideas. Luckily, I had a great partner who made it very easy for me to communicate my design. With Tara's design, I had to build my confidence in myself further as I was worried about completing her design in the way she wanted it. In the first practise, the height of her hair was not how we planned and the bun was not in the style Tara had described. However, after great communication with my partner and many practises I built up my skill set, became much happier the create the design (within the time) and produced a final look I was pleased with. It was a very useful task to work to my partners brief as throughout my career this will become a large aspect of my job and I enjoyed becoming a team with my partner to create the best we could.

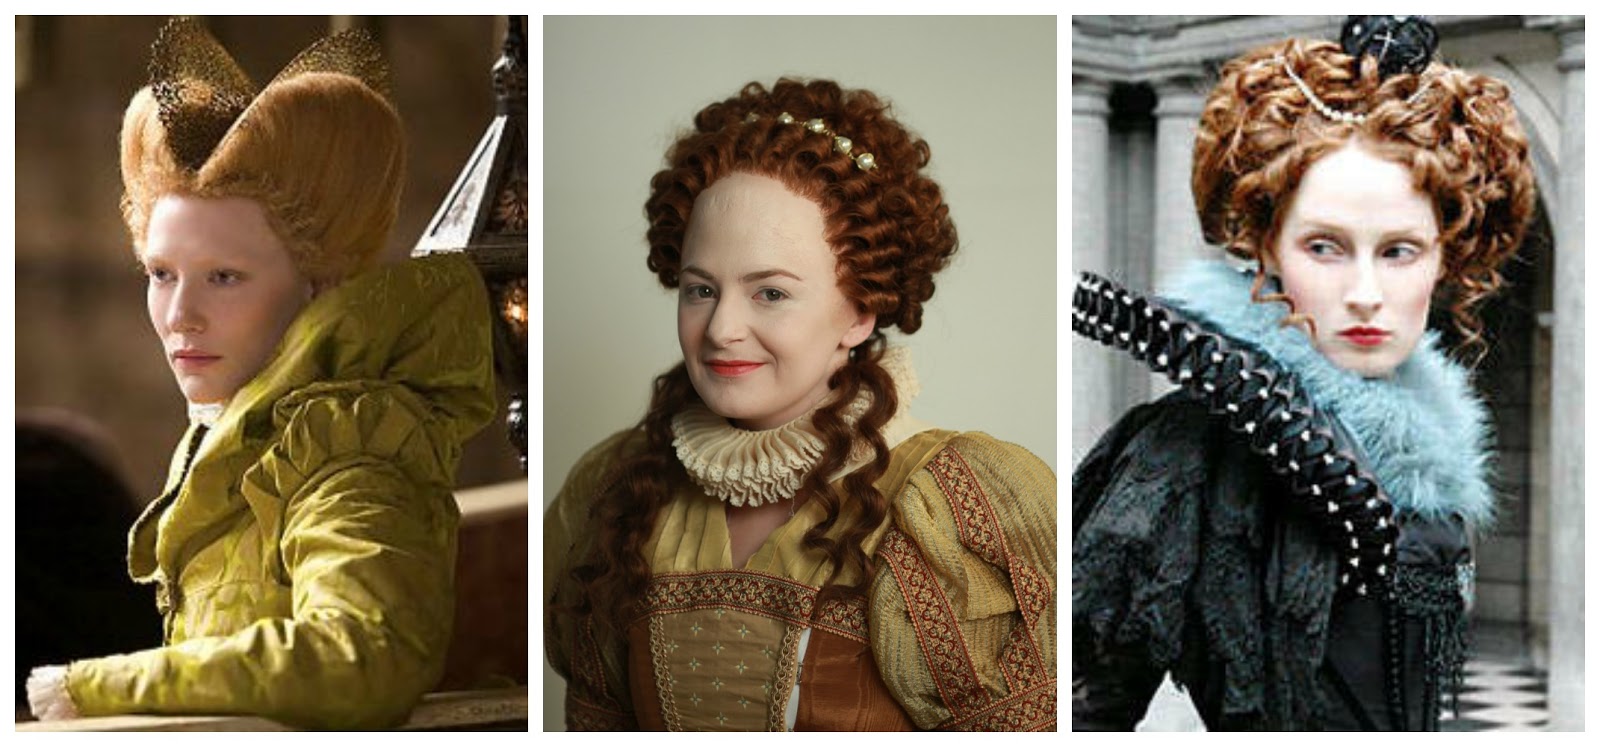
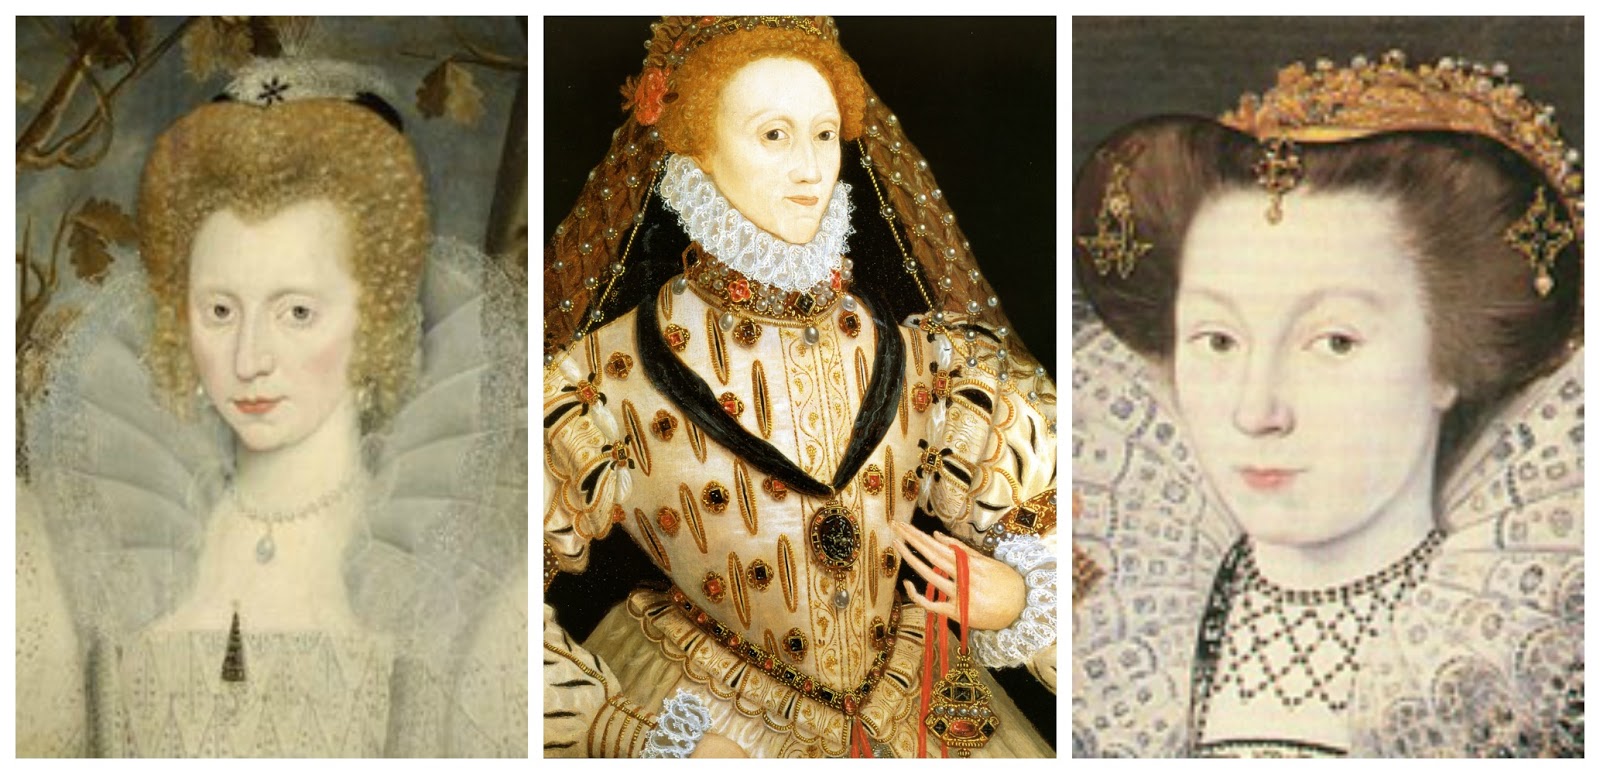
Throughout this project, I have developed my research skills by using articles, books and websites for information and magazines and films for inspiration. I wanted to begin by researching the stereotypical styles of Queen Elizabeth and then further look into society and how other women would've styled their hair. I enjoyed comparing and combining contemporary styles I liked with historical looks and researching how modern designers do the same. 

Overall, I feel this first project was very successful as it has given me the all the skills in hair styling to develop throughout my education and beyond. I have also developed my communication skills and the one thing I would change if I were to do this project again I would've practised a little bit more the get my skills perfected before the assessment so I did not panic before!


Bibliography

Books
  • Jean Keyes. 1967. A History of Women's Hairstyles 1500-1965. Published by Methuen & Co (London) Chapters: 1550-1565, 1565-1585, 1585-1605.
  • Susan Doran and Norman Jones. 2014. The Elizabethan World. Published by Routledge (Oxfordshire) Chapter: Society – Women. Pages 335-349


Websites


Films
  • Elizabeth 1998 (Film) Directed by Shekhar Kapur


Visits/Exhibitions

  • Tudor and Elizabethan Portraits – National Portrait Gallery (15th October)

Assessment - Me as Designer and Tara as Stylist


Following my assessment last week, Tara completed her assessment with my New Elizabethan design in the allocated 2 hour time slot. She was a great stylist and I am pleased with the outcome.

Tara prepared by having my step by step instructions, hair designs and photos from practise sessions to help her have the best shot at the design. After crimping my hair successfully and in good timing, Tara slightly worried about getting the shape right but she achieved it after sectioning the hair properly. I am extremely happy with the shape from the front as it is symmetrical and the roundness I asked for in my design. From the side, it is slightly uneven however the silhouette is sleek and polished which is inclusive of my 'bridal' design. The bun was achieved efficiently and looked beautiful at the end with the pearl adornments. We did not have enough pearls to decorate the plan, that was included in my original design, but this may be a result of not using the pearls before this attempt. Unfortunately, when we went to take the pictures the curls became unpinned from underneath the bun so it did not have the volume I desired, however, the curls are exactly the style I wanted. 

I feel that Tara's strength throughout this assessment (and all the preparation!!) has been her backcombing skills and creating the height I wanted. She has never failed to create the Elizabethan inspired rounded and volumized hairstyle! Considering over this short period of time since starting, Tara have gathered a lot of skills but I feel that in this timed assessment her weakness was maintaining the rounded, circular shape all around the head.

Overall, Tara was very professional whilst completing my design by being very organised, calm and friendly. We have had multiple practise sessions and Tara was always helpful, prepared to listen to my advise and always put the effort in to make it the best she could!


Assessment - Tara as Designer and Me as Stylist


This week, I completed my timed hair assessment with Tara's New Elizabethan design. It was completed within an hour and a half and overall both Tara and me were very happy with the outcome!

The first step of the hair style was the messy french plait across the top of her head behind her fringe. I feel I achieved the style Tara was looking for by pulling at the plait once it was in place to create the loose and varied texture throughout the plait. Tara also asked me to have some fabric running through the plait for the final images and as this was the first attempt at weaving it through the style I was a bit apprehensive but when I decided to thread it through the hair after I plaited it, it worked out successfully and Tara was pleased we went ahead with the adornment. 

Following the plait, I created the backcombed back section. In the final photos, I love the shape from the sides as it shows the volume and texture the design asked for. From the front, the middle is not as rounded. If I were to re-create this again, I would make extra effort to backcombed her middle parting behind her fringe even more so than the rest as I feel the way her hair naturally falls works against the the technique I was using. However, overall I am please with this section as her desire to have a messy look has been embraced from behind and stray hairs and frizz adds to Tara's character design. 


Finally, the plaited bun with pearl adornments was created. Unfortunately, I feel this was the least successful part of the final look. The reason for this being that in the final photos one pin had not been secured properly and one of the plaits became loose making the bun uneven and unintentionally messy-looking. I have inserted a photo of the bun after I have completed in the studio when I was much happier with it as it symmetrical and much more how I planned it to look. I do think the plaits could be more defined and visible as the centre of the bun does not clearly show the plaits so if this were to be done again I would probably leave more hair for the plaits to make them bigger and more obvious. The pearl adornments were also requested in this assessment and I am happy with the placement as it pulled the look together and added the Elizabethan touch that this modern look needed. Yet, like I mentioned I would make sure they are more secure so the final images would've been neater! This error would be avoided if I had the chance to do it again as I would know how to insert these pearl grips properly.

After completing this assessment, I feel my strongest part of this look was the french plait as it was the most accurate to Tara's design and most polished aspect of the final attempt. I knew how to produce a french plait beforehand so I feel this definitely gave me a slight advantage and make this part of the process easier! My weakness was my backcombing skills. It took me a couple of practise sessions to find the right technique for this look and I am frustrated with myself that the centre of the backcombed does not have the height from the front that I would have wanted. 

Tara was a great partner for this assessment as she was very clear in her designs and the exact style she wanted. She was prepared for many practise sessions to help me get to grips with her look, she was always open for my questions and pointed out any issues in a friendly way!! Also, outside of university we communicated a lot with any issues and helped each other resolve problems out of class time. I would love to work with her again and I have a lot of confidence in her to complete my New Elizabethan hairstyle.


2nd Attempt with My Design (Tara as Stylist)

In our second practise session, Tara styled my hair again for my New Elizabethan bridal look. The images show her completed attempt within the 2 hour time limit.

I am very pleased with the final outcome of this session. The raised and rounded frizzed section is a great shape and is very smooth round the edges - the sleekness is how I would imagine a bride would desire their hair to be! From the front, the style looks simple and polished which is exactly how I desired it to be in my design. Moving onto the elaborate back of the style, Tara decided to create the look using two plaits to define the separation between the bun and the crimped hair as previously this was not there. It also helped Tara a lot this time round to section the hair into four areas before starting so she knew exactly how much hair was used for each and each section would be obvious - this is a step I would be sure to include in my consultation notes for the assessment. Slightly less hair was used for the bun, as discussed in our last session, to have more curls and it fitted in well with the rest of the style. The curls were also very effective as Tara pinned them up and under the bun to give them more volume and to appear as though are falling from the rest of the hairdo - an aspect often used within modern bridal updo's. 

There is not much I can ask of Tara to improve! Tara took on board my requests and her struggles from the last session and created the look I pictured in my head. However, one thing that could be perfected is the neatness of the round shape at the front. The last image shows how the hair above the left ear is not connected to the head like the opposite side. I pointed this out to Tara (being very picky!!) and she will try and perfect this before the assessment. Otherwise, this was a successful test run before the assessment and if we can practise again the assessment it will only be to boost Tara's confidence and gives her a chance to perfect the style.

2nd Attempt at My Partners Design (Me as Stylist)

Plait
I started the second practise session with Tara's design by creating the french plait that goes over her head from ear to ear. To begin, I sectioned the hair amount of hair I needed behind her fringe into a middle parting and kept the sections either side even to keep the look symmetrical. In my first attempt, I found it difficult to have the start and end of the plait the same. This time I started lower down her head, more so by her ear, and after I had completely the french braid I loosened the style up with a metal pin comb which gave the impression of the hair being the same thickness all over (by loosening some bits more than others). As part of Tara's design, she wanted the plait to be very messy so I have taken photos of the plait at the stage Tara felt it was the right style for her character's hairstyle. I also discussed with Tara what she wanted to do with her fringe and she has decided to leave it out straight (as it would be awkward to include in the plait neatly and she did not want it crimped).

Backcombed Section
For the crimped and frizzed section, I began by crimping all the remaining hair behind the plait. I then sectioned the hair, layer by layer, to crimp and backcomb (using a thin-toothed comb) from bottom to top - focusing on the roots. To shape the hair into the rounded look Tara desires, I then used an afro comb to soften the frizz from the backcombing and pinned the hair in sections using hair grips. I gripped the hair in sections (from one side of the head to the other) to make it easier to make a symmetrical and meant I can take sections out of the grip again to backcomb more or smooth the hair. Tara was pleased with the shape as she does not want it to be extremely high. I felt there were quite a lot of flyaways, as a result of the backcombing crimped hair, that I will attempt to smooth in the final assessment. However, Tara stated it added to her 'crazy' personality linked to her character so it may be worth leaving the messiness in the look.


Plaited Bun
Tara's plaited bun design
Following our inital trial of Tara's design, we agreed to change the technique of creating the plait to make a larger finished bun. Instead of creating a ponytail and plaiting that hair, I separated the hair into three sections and plaited them. I then wrapped the middle plait into a circle and pinned into place. After that, I wrapped the other two around to create a rounded shape. Both of us were much happier with the section plaited bun shown above as it was larger and more like the style Tara had practised in the designing stages. Even though the first in neater, it is not as in-keeping as the second bun as it is messy and looser (I teased the plaits before pinning to achieve this). I feel it could be more round when I create it for the assessment and I can do this by pinning the plaits into a tighter circle shape and then teasing the hair to create Tara's loose design.  

Overall, I am very pleased with my second attempt has been very successful. I have achieved the style of bun Tara really wanted and the issues with the plait behind her fringe have been solved. I also completed the style in less than the 2 hour limit. Tara and I want to have a final practise session before our assessments and I feel like this will be a perfect time to perfect the techniques (so it is not trial and error on the day!) and be very confident in the process.

Modern Bridal Half Updo's - New Elizabethan Design Inspiration

Following my final hair design process and the trials of achieving this look on my hair, I wanted to further research modern bridal updo's to refer back to. I want to make sure I am able to incorporate these ideas with Elizabethan techniques. I used pinterest and google to find some images that reflect my ideas of a New Elizabethan bridal updo.

Each look has the hair carried back and away from the face into a small quiff or raised area at the back of the head. This will be to keep the attention on the bride and emphasis their beauty, not to detract from it. On my design, I feel this has been included through the crimped, backcombed hair pulled back into a circle shape to demonstrate the Elizabethan high hairline and frizzing technique combined with modern shaping and styling ideas. These images often also have a focal area to break up the gap between the quiff and curls underneath. Some have a bunch of curls, wrapped round hair or buns. For mine, I have the plait and modern bun as two more sections to add a modern twist on top of the Elizabethan techniques shown at the front and top of the hair design. Finally, the curls complete the look. I wanted to include ringlet style curls to reflect back to typically modern bridal hair styles. Having researched historical and modern looks, I have to achieve my final style including an array of ideals from each era. 

1st Attempt with My Design (Tara as Stylist)

This week we had the chance to swap our hair designs with our partners for the first time. Above are the images of Tara's first attempt at mine. My final design can be found here

I think Tara's styling turned out to be very successful. The backcombed and crimped section had great height and stability, without a hair rat or padding. She used an afro comb instead of small-toothed comb to backcombed and this meant the finished look was less tangled and frizzy and more smooth and soft (to keep in theme of my bridal hair design). I was massively impressed by the finished front section as it was higher, bigger and smoother than I expected!! Unfortunately, I do not have a photo to show the front but it was a nice rounded shape, we agreed the front needs to be perfectly symmetrical but for a first go it was great!! The bun was also slightly altered as Tara was not happy with the shape of the 'modern bun' when she tried it out. Lottie showed her an alternative technique and it produced a style that was less obviously modern and tied into the finish look even better than the original design! It is more interesting and eye-catching than the standard round bun. 

In our next practise session, I would like Tara to work on the plait. The actual plait was how I desired it to be, however, in the images it is quite hidden and I want it to be shown as one of the features of the hair. It may be that there would be slightly less hair in the backcombed section so there is more space for the hair to be in a plait. Also, Tara explained to me how she will use less hair in the bun next time and more in the section left down and curled. This is because Tara was saying the bun was quite hard to work with because of the amount of hair she had sectioned off for it and also we would like to see more curled hair. Finally, I asked Tara to also try and pin some of the curls up and under the bun to finish of my desired look. 

Overall, the session was very useful to help me communicate my ideas with someone else and see how practical my design is on my head. I am still happy with my design, and also the alterations Tara made, and I feel it still in-keeping with my New Elizabethan bridal hair design for Lettice Knollys. Also, it was a great time to get to know Tara and become a team to help each other and our first trials were both a great start and the next practise session should mean we can perfect each others looks! 

Anne of Denmark - National Portrait Gallery

On our trip to London, we visited the National Portrait Gallery. Specifically, we looked around the Tudor and Elizabethan section. The Tudor section was overwhelmed with royalty and many portraits of Queen Elizabeth I herself, however, one image caught my eye through her angelic ora. 'Anne of Denmark' was painted at the end of the Elizabethan era, between 1605 and 1610, and demonstrates the wife of King James VI in an elegant silvery-blue gown and simply elegant makeup. This portrait reminded me instantly of a bride through the pale colours used in the material of her dress, the pearls wrapped around her chest representing virginity and her polished, pale complexion and neat hair to show royalty and wealth. The reason I have chosen to include this particular portrait in my research is to show a style of hair and makeup that symbolises to me an Elizabethan bride to tie in with my final New Elizabethan bridal design. 

1st Attempt at My Partners Design (Me as Stylist)

For the final assessment I am working with Tara. She came to me with the three images on the left as inspiration for her desired hairstyle. Her character is image conscious and so desires a polished hairdo but has elements of madness in her personality that Tara wants to portray through little details in her design. For example: the plait running across the top of her head would be messy and the hair will be crimped and backcombed.


To start my first attempt, I began by sectioning her hair so I could create an even plait running behind her fringe. I braided the hair into a french plait and pinned it behind the ear, so hopefully the ending of the plait cannot be seen. In our next practise session, I will improve the plait by starting the braiding lower. The first image on the left shows how the plait does not actually start until about half way up and the other image shows how it ends behind the ear. To solve this, I will begin much lower down on Tara's head to make the plait more even and symmetrical. 

After I created the plait, I proceeded to section her hair further to create the elevation behind the plait that Tara wanted. I crimped the section and backcombed it with a pintail comb. I was finding it difficult to build up the right height with this particular comb so I moved onto using the afro comb and this made the technique easier and the finished result a lot smoother. From the front, it did not seem to have a lot of height but Tara was happy with this look to keep the hairstyle polished from the front and messy from behind. Next time, I will be able to be more confident with my backcombing and will be able to achieve the look much quicker. I will also try and gain a bit more height with the more time I will have so the front is more fitting with the height of the back. 

Finally, I attempted to produce a plaited bun at the bottom of the head. I put the hair in a ponytail and plaited it. As the hair was only partially crimped, due to my sectioning, there was different textures so next time I will definitely crimp the whole head. Once it was plaited, I teased it to make a thicker plait, wrapped it around itself and pinned it into place. Tara was happy with the style and agreed the texture should be consistent, however, I feel that in the next practise I will use more hair in the bun to create a bigger style as the plaited bun looked disproportional in comparison to the large plait and backcombed section.

Overall, I found this lesson very useful to have our first attempts at being designers and hair stylists. It gave me a chance to get to grips with Tara's hair type, length and design and allowed me to discover what I will need to do to make sure it is technically good as well as being how Tara has designed it. I have gathered enough information to hopefully perfect the look in our other practise sessions before our final assessments! 

New Elizabethan Hair Designs

1st Design
My first design is heavily inspired by the traditional Elizabethan heart-shaped hair and high hairline. My modern take on this look is to include a heart shape in the back of the hair style as well. The hair shown on the 'front' of the head in my drawing would be created using padding with a hair rat. Also, the hair ideally would be crimped to add to the Elizabethan element of the design. 

The back of the head would be separated into a heart shaped and raised with the aid of backcombing. I attempted this style on my model head at home to try out the techniques I have proposed.

To begin with, I section the hair into a heart shape using a pintail comb. I kept the sections of frizzed hair at the front away to make the sectioning a lot easier and to keep the sections even. Once I had divided the hair, I backcombed the heart shape to make it seem raised and more obvious. I created my own hair rat with tights and cotton wool and used this to created the round shaped shown above. I was unable to complete the look as I did not have any more tights or hair grips! Although I was able to gather enough information through my practise to understand my design and the practicalities of it further. I do not want to use this as my final design as I think it is too obviously 'Elizabethan' and for my look I want to create a more subtle design incorporating both modern and historical techniques. As well as that, I recognised with the harshness of the style I wanted to make the look softer with more details to make the hair look more youthful - as the Elizabethans so desired!


2nd Design


I have been working on my second design for a few weeks now in and outside of lessons. My technical and practise posts can be found here:


With this design, I really enjoyed creating the plaits and adding adornments to gain confidence in experimenting further. However, I do not feel this elaborate enough to incorporate different skills and have a high enough technical element to it to be a piece I would be very happy with. Therefore my final design I will incorporate sections of both of my designs so to create one that is elaborate and includes various techniques. 

Final Design
Following my previous experiments and design, I have created a final hairstyle I want to re-create to portray a youthful New Elizabethan bridal style. The style incorporates the 'half-up half-down' style that is popular in recent years but also can be recognised in multiple Elizabethan portraits so is a perfect style to include both techniques. I wanted the look to be gentle and rounded at the front to keep the look soft, much like the styles of younger woman in Elizabethan times. I also want it to be decorated and elaborate at the back to demonstrate a beautiful bridal design as well as more juvenile and youthful style, as opposed to the well-recognised stiffness of the heart-shaped and hat-adorned hairstyles of the aged Elizabethans. 

The left hand side of the drawing shows the simple look of the style from the front. I want to use a hair rat to padding the hair into a semi-circle on the top of my head, framing my hairline. The hair would be crimped and brushed out to replicate Queen Elizabeth's favoured technique. Directly behind the padded hair, there will be a small french plait adorned with pearls (attached to hair grips to slide into the hair easily). The remaining hair would be spilt into two sections, the top section would be taken into a modern style bun and decorated further with pearls around the circular shape. The bottom half of the hair that is left would be curled using the modern technique of 'spiral curling' to create loose curls. Some pieces of hair would be pinned underneath the bun, against the way the hair falls, to add more volume and layers and the rest of the curled hair would rest over the shoulder onto the front of the body.


These images above show the techniques I have practised that I would like to incorporate in this design. I am very happy with my final design as I feel it will be a well-rounded combination between modern and historical Elizabethan styles. 

Contemporary Plaited Updo's

From brides to catwalk models, plaits and updo's are a staple and beautiful combination. In regards to Elizabethans, plaits were discreet and neat and interpreting this into a modern design will be aided by the influence of modern styles.


The loose plaits shown in the first and third photos are a recent modern trend. They can take many forms using different types of plaits like french, dutch and fishtail as well as being plaited across the hair line or down the centre of the hair. I used these types of styles as an influence for my Bridal Hair in a less technical lesson, however, I do not feel it would be suitable for on of my final New Elizabethan designs as the techniques to create the plaits are all very modern. 

Having the hair completely up, like the second and fourth images, results in a neat and polished final outcome. Plaits can be used within the updo, across the hair, in the bun or wrapped around other designs within the updo. One of my final designs will incorporate an updo style so I am able to create a polished outcome with multiple techniques included, for example a plait, bun, padding or crimping!

This Elizabethan portrait demonstrates an updo in action, including adornments and intricate curls. The back of the hair is covered so it is not certain how the hair is kept, however, the style sustains the need to keep the hair off the face. The tight curling technique could be one to use within the modern plaits and updos. My modern attempts can be found here.

Chanel Heart-Shaped Hair


In 2010, Chanel designed 'heart hair' for their S/S collection. The style was influenced by Marie Antoinette through the height of the hair, decoration and colours in the hair. However, the actual shape and outline of the hair is very Elizabethan-esque with the centre parting and raised, rounded and backcombed hair. It seems the hair stylists would've used similar frizzing and padding techniques we have explored so far and the simplicity of the shape may be one to take into account with my hair designs. Also, the smoothness of the rounded hair is a finish I would like to incorporate into my New Elizabethan hairstyle. The large adornments complete the look, leaving the focus directly in the middle of the hair and above the face. The light hair colour and pale extensions combined within the look do not detract from the show-stopping clothes and so the actual colour of the hair will be important to also take into account through my designs.

The heart shape in the hair can be seen in this Elizabethan portrait. Although it is more subtle, the shape is prominently symmetrical and appears to also have been shaped with padding like a hair rat. The hair colour is dramatically different to the modern interpretation and  adds a more solemn tone to the portrait, demonstrating the dramatic affect the colour has. 

My attempt at creating a similar shape can be found here

Modern Interpretations of Elizabethan Hair

In the past 50 years, the Elizabethans have been an inspiration for styles in films, fashion and modern beauty. Our modern takes on Elizabeth Tudor's influential style is interesting research to take into account when I am designing my own New Elizabethan hairstyle. 

The first image shown above is a still taken from the 2007 film 'Elizabeth: The Golden Age'. Jenny Shircore, the hair designer, decided to heavily base her interpretation of Elizabeth's hair on portraits of her. The heart-shaped hair is widely known as a trend set by Queen Elizabeth I. In this modern interpretation, a large metal adornment is incorporated to resemble a crown and is an interesting modern technique. It also seems that the tecnique of frizzing is used around the hairline to emphasis it further. Shircore's design is a striking and polished one that will be good to use as an influence for a neat and more obvious design for a New Elizabethan.

Jill Elaina Haley is an American-based wig technician and makeup artist. The second image shows her Elizabethan Era project where she created the elaborate wig including tight curls, frizz and adornments. Jill blocked out her hairline to create a historically accurate interpretation of Queen Elizabeth's famous hairstyle. It is an interesting and precise look that will be a useful inspiration for creating a new look as it contains modern techniques to create a historical hairdo. Also, the half-up half-down style is an engaging idea as this is very popular in recent years and incorporating that into a New Elizabethan style will show this contemporary idea.

The final contemporary look demonstrated in the imagery above was found on Pinterest. I have included this design in my research as I admire the way the heart-shape style is subtley included underneath curls instead of frizz. This idea may be one to take into account when styling my New Elizabethan design to make the idea more contemporary.

Reference: Jill Elaina Haley. 2015. Elizabethan Era Project. [viewed on 27th October] Available at: http://jillelainahaley.com/elizabethan-era/

The Use of Padding in the Elizabethan Era

At the end of the 16th century, following their Queen Elizabeth I, middle and upper class hairstyles became very elaborate. The women of the Elizabethan era would pad, frizz and decorate their hair. To create the styles shown above, the technique of padding would've been used. Women's hair would've be pulled back from behind the hairline and ears into a neat coil and secured with threaded ribbon or thread against the head. Sometimes it could've been braided or padded underneath to make a larger, more secure shape. 

Hair adornment would then be useful to decorate the hair. Coif's would be used to hide the back of the head and emphasis the style of the padded front of the hair. Pearls may have been added to the outline of the hair to decorate. Examples of these are shown on my 'Elizabethan Hair Adornments' post. 

Reference: L. Mellin. 2008. Extreme Costuming [viewed on 26th October] Avaliable at: http://www.extremecostuming.com/articles/twoelizabethanhairstyles.html

Modern Bridal Hair

Compared to Queen Elizabeth I's abstance with marriage, being a bride has almost become a fashion trend in itself. Bridal hair is a massive business in the 21st Century and often incorporates curls, plaits and buns - trends seen in Elizabethan society. In today's lesson we were given a brief to create a bridal hairstyle where at least some of the hair was up (and if partly up, the rest must incorporate curls) and plaits were used as a technique in the look.


My initial design included a loose french plait going across the top of the models head and round to the back that turns into a plaited bun. Following from the bun, I wanted to then produce a very loose and boho fish tail plait (with loose curls around the head). My inspiration for my sketch was a 'boho' bride and I did not want the style to be slick or polished.


The images above demonstrate my attempt to translate my design onto a models head. Luckily, Charlie's hair was lovely and long so I had plenty to work with! However, I do feel my final images show that it is not very 'bridal'. I really loved the loose, large french plait on the top of Charlie's head as it was the exact style I wanted but the fishtail was too narrow and was difficult to make looser without looking un-styled and too messy or frizzy. I do like the incorporation of the plaited bun as it separated the two styles of plait at the back of her head. As I was not happy having all the hair up in the unsuccessfully styled fishtail plait, I made another attempt at a bridal hairstyle with just the french braid.


This is my second attempt at creating a bridal look. I am much happier with this style as the curls and piece at the back of the head portray more of a bridal hairstyle. I used a pintail comb to tease the hair from the french plait, making it looser and larger. This teased plait would definitely be one I would like to incorporate in a New Elizabethan look amongst crimping or curls. For the back of the hair, I wanted to still keep it as interesting as the bun but less precise so I gripped pieces of curled hair up and away from the direction of Charlie's hair so it would fall back on itself and create volume and more of a shape (than if it were to be pinned in the same direction). The shape of the back piece almost looks like the bottom of a heart shape and I want to try and develop this further into my final design.

Curling, Frizzing and Shaping the Hair

Our week 4 lessons with Lottie and Helen consisted of using each other as models to create an Elizabethan hairstyle using traditional techniques. As I missed week 3's lesson, I had to experiment and produce a style on the spot without a plan.


I had not learned the technique of crimping and frizzing before starting on Beth, so to begin with I started with a spiral curl technique that I was familiar with to incorporate a style of curl into the Elizabethan style. Looking back on my choice, I feel I should've perhaps used a roller curl to create more volume. Once these curls were released, I started to backcomb the front section of her to start shaping it into a heart shape. 

I feel the shape was reasonably successful in creating a high hair-line and a divided, volumized heart shape. However, I feel it could've been much bigger if I had used a hair rat or crimping. This look I created is a simple and toned down version of how I would've wanted it to look. Also, the parting could've been clearer when you are looking above Beth's head. As I knew we had to incorporate a bun shape at the back
of the head, I simply created some rolls at the back to finish the look. I do not feel this could've been my best attempt but as I had missed a previous lesson learning the techniques I realised I have to practise more to create a better look. My finished attempt on Beth was not large enough to compare to an Elizabethan look, and I feel I could've incorporated more techniques (crimping and padding). I really struggled to get to grips with creating a look on the spot, so after the lesson I practised on my model head to perfect crimping and shaping this hairstyle. 


On the Kate model head, I crimped the hair all over and brushed it out to create the 'frizz' used so often in Elizabethan hairstyles. Following that, I divided the hair into a centre parting and backcombed the sides to make the sections sturdy enough to hold itself in the desired heart shape. The first image shows my attempt at this. I feel this second attempt is a more successful shape compared to the one in class as it is much more structured and solid (leaving the heart shape clear), as well as having more of an Elizabethan feel having the crimped texture. I finished the look off with a simple twist bun. The result of incorporated all the hair into this left an unintentional heart shape from the back of the head too. Once I noticed this, I used a pintail comb to tease the heart into the heart shape further. The attempt became much more effective with the shape as well as the frizzing technique. I also developed an idea to incorporate tiny plaits over the backcombed hair to add another dimension to the hair - almost create a cage or adornment on the hair.


In our Elizabethan Adornments lesson, I created a heart shaped plait (shown on this blog post) and developed a successful technique to re-create the look. I wanted to include my new skills into this look to develop it further. The crimping and frizzing technique allowed me to create a raised heart shape within the plait. It also allowed me to have a higher and more rounded front of the hair.


Elizabethan and Modern Curls, Frizz and Shapes

Throughout Elizabethan times, Queen Elizabeth's periwigs had certain attributes that were influential to women across the country. Aside from the fiery red colour, Elizabeth often sported tight ringlets or frizzy curls. These styles could be seen in heart-shaped updo's or, like demonstrated in the portrait, are sections left loose to rest of the shoulders. The wigs were always rounded and soft and usually with an angled centre parting creating the iconic heart-shaped hair line. The ringlets also left a wavy silhouette to periwigs. 
Modern interpretations vary to a degree as the shapes are less defined and are literally more frizzy! The more contemporary craze for backcombing is seen often and is the technique that removes a harsh shape to the hair. Demonstrated in these images I found online, the shapes are loose, large and wispy. Any curls and crimping are roughened up with this technique leaving the model with an identifiable modern Elizabethan look.


Elizabethan Society - Who Wore The Curls?


The Elizabethan era is associated with Queen Elizabeth I's reign through 1558–1603 and is considered to be the Golden Age in England. 

Elizabethan attitudes towards women were shaped often by the tales and ideals drawn from the bible, however, it was becoming a time daughters were inheriting estates and a woman could be queen - although parliament named Elizabeth supreme governor, not supreme head, of the English church (Doran and Jones, 2014). Women of this time were still expected to marry to increase the wealth of their family. Careers were almost non-existent for women and in homes they were seen as inferior to men (Alchin, 2012). Ideal female behaviour suggested that women would be chaste, quiet and obedient. Marriage was expected of all women to be dependant on their male relatives and produce children (preferably males). Some women did manage to negotiate these terms to exercise degrees of independence through passing on successful wills demonstrating their wealth they have collected from the family and distributed it to their heirs. The icon of the era Queen Elizabeth herself, however, made it clear in a public announcement that she was exceptional and did not consider herself a model for other women (Doran and Jones, 2014). Looking back on this historically, it is very ironic how she was the model for makeup and hair throughout her reign and afterwards.

Family life for men in the 1500's was a life of power. They made decisions and orders, expected to be followed by their wives, but also were expected to support their families. A man's earnings would go towards making their children wealthier and improving their social positions for them when they were older. (Alchin, 2012). If a man were to become a widow in this era, he would indefinitely look to remarry (especially if he has children). In a sense, this hastiness removes any importance or love for the previous mother, wife and woman. This reflects the nature of the society between 1550 and 1600.

References


New Elizabethan Plaits and Adornments

Elizabethans are famous for their elaborate accessories and adornments that are incorporated within their fiery red curls. In Helen's lesson this week, we explored various ideas to include ribbons, beads and jewellery into a modern elizabethan design.


Hearts are shown in multiple illustrations and references to the Elizabethans - whether it be there heart-shaped hair line, crimped hair or hair decorations. Therefore, to start an idea I wanted to include the heart shape in a plait at the back of the head. I started by dividing the hair down the middle and moving the bottom part of the hair to one side (to create a half up, half down look). To begin the heart shaped, I faced the model towards me and started a small french plait at the back of the head and plaited it slightly towards me. I slowly curved the plait by bringing in more hair, in each section of the french plait, from the left of the plait and underneath. Once the curve was created, I continued to form a classic french plait towards the nape of the neck. The looser end of the plait allowed the hair to be more relaxed and created a thicker style. 


The difficult part began when I needed to make the shape symmetrical. The first image shown on the left is my first attempt at the second half of the heart. The shape was lost and less defined than my first half. Beginning with the top, it is not tight enough to the scalp so I did not have enough tension and contact to begin with. This then developed into the plait not being controlled and the shape was completely lost. I attempted it again as I found it frustrating how hard it was to complete symmetrically. The second image shows my further attempt that was more successful. The point of the heart shape at the top of the head is more pronounced and defined and the plait becomes looser towards the end. Ideally, this attempt would've defined the heart more all around the back of the head but I practised the skill further at home and developed a technique to produce the shape every time. 


Final attempt in class.
Showing heart shaped front of hair
and adornments in plaits
Practise at home.
The three images on the left show my stages I practised to produce a reliable technique to recreate the style every time. To start with, I separated the hair into a heart shape using a comb to produce the clear line in the hair. Once I achieved the desired shape, I could plait around the shape leaving the definition there. I plaited both sides around the shape to neatly create a heart shaped plait around the sectioned hair. The develop this further I could raised the hair in the heart shape, or pad the front of the hair and curl the hair underneath the design with Elizabethan inspiration. 

After the lesson I wanted to create a second design including more plaits. Again, I divided the hair to allow for different styles and the photos demonstrate the two main plaits. on the left hand side I produced a standard french plait and the opposite plait is a reversed french plait (or a dutch braid). I decided to practise the two different plaits and incorporate them into this look to demonstrate my skills to produce both. I personally prefer the reversed braid as it produced a sleeker and more modern hairstyle. If I continue to develop this idea in the future I would most likely use that plait on both sides. I also added some small basic plaits throughout to add more layers and depth to the hairstyle. Once I develop more Elizabeth techniques, I would like to raise the plaits or crimp and curl the bun at the nape of the neck.


Spiral and Roller Curls

Technical #2 with Lottie Davies

In this lesson, we were looking at two different types of curls: roller curls and spiral curls. We needed to know how to achieve them and the difference in the final results.

Spiral Curls


Setting the curls
To start with, I sectioned the hair into half and then divided the one side again to make it easier to curl all the bits of hair equally. I then took the curling tong and wrapped the hair around the barrel vertically until it reached the head. To prevent burning the scalp, I practised using my plastic comb in between the head and the tong the protect the model. Each piece of hair should be curled the opposite way to the piece before - for example the first piece will be curled away from the way so the next should be curled towards the face. This is so the curls are not uniform as when they drop, otherwise they will all fall the same way and look unflattering. Once the hair had heated up, I released the clip and let the hair out. To set the curls, I used a hair grip to pin the curl together while it cools down. At this point, we were advised not to use any hairspray to keep the hair as natural as possible but to also prevent any whiteness appearing from a combination of mixing heat, hairspray and brushing. 

I continued this technique of curling, releasing and setting all around the half I was working on until it was all curled and cooling down. Once the hair was completely cool, I removed the pins and let the hair drop. The first image below is the hair when it first was released. The curls are loose and layered but are reasonably flat on the top of the hair (as a result of the way it is curled, without the emphasis being on the volume). The other images show the hair once it was shaken and had my fingers run through. The curls have more volume and have merged more. 


I feel with more practise I would be able to complete this task a lot quicker as it took me 30-50 minutes to complete one side of the head. The challenging part was releasing the hair from the heat and pinning it into place before the hair drops and I know the only way to make this easier for myself is the practise! This way of curling is new to me, as I use a curling wand usually, so using a barrel wand has allowed me to gain a new skill in curling and I now understand the most common way to curl so I will be able to confidently use this throughout my career. 

Roller Curls


To start the roller curls, I separated the hair once again and this time the curling barrel is turned sideways and the hair must be curled underneath itself so I creates volume once it has cooled. I pinned each piece again to set it horizontally and continued to curl each piece in the same direction, as this technique is purely about creating the volume and there is less focus on the direction of the curl. Each section of the hair is curled in uniform lines and the sections above and below should be in a bricklaying pattern - the curls should not be in a uniform line going up the head, they should be overlapping. This is so, again, the curls are more flattering but also create more volume. 

The first photo below shows all the layers roller curled and set with hair grips. The middle photograph demonstrates the hair once the pins are taken out - because of the technique of rolling the curl underneath itself, it holds it up and keeps the volume on its own. The final image is the head after it has been shaken and brushed out. Compared the the spiral curls, this hair is extremely volumised with defined ringlets in the hair. This technique would be excellent for Elizabethan hair as it will aid the method of creating buns or high hairstyles, as well as creating the tight curls that are very reminiscent of the 1500's.

As I completed this curling technique after the spiral curls, I had gotten to grips with working with a curling tong and managed to create tighter curls in a quicker time. As well as that, setting these curls were a lot easier and they held themselves up in the time I had to set them. I will continue to use and practise this hairstyle as it is another great technique to curl hair whilst having a lot of volume to work with in future - for example my final New Elizabethan look, an avant garde creation or a runway design.

Powered by Blogger.
Back to Top